TL;DR:
- Deployments in Kubernetes ensure higher availability and easier rollbacks compared to managing raw Pods directly. Proper preparation, including verifying cluster health, controlling YAML versions, and setting resource requests, prevents deployment failures. Following best practices like explicit version tags and deployment health checks enhances stability and resilience in production environments.
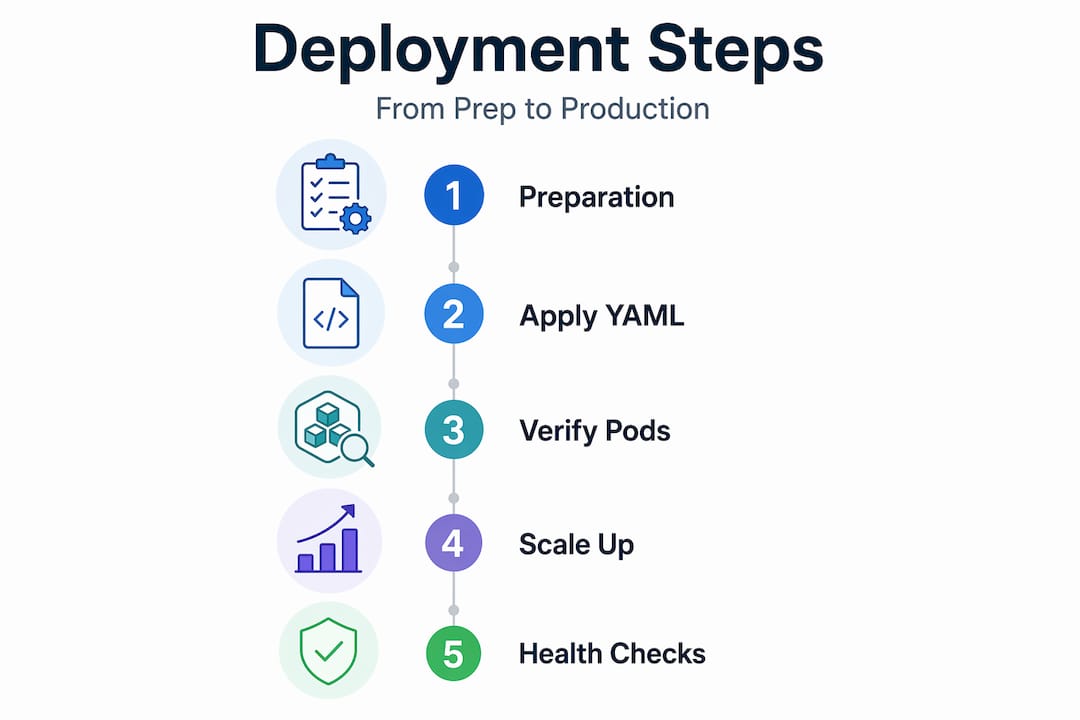
Kubernetes deployments failing in production is not a rare occurrence. Misconfigurations, single-replica setups, and missing health checks cause unexpected downtime that costs real money, especially in fintech where uptime is directly tied to revenue. A kubernetes deployment step by step approach changes that. Instead of reactive firefighting, you get a repeatable, auditable process that your team can execute confidently. This guide walks you through preparation, execution, best practices, update management, and production verification so every deployment your organization runs is grounded in discipline, not guesswork.
Table of Contents
- Preparing for your Kubernetes deployment
- Executing your first Kubernetes deployment step by step
- Best practices for stable and resilient Kubernetes deployments
- Updating and troubleshooting Kubernetes deployments effectively
- Verifying and scaling your Kubernetes deployment for production readiness
- Why many Kubernetes deployments fail and how to succeed instead
- Enhance your Kubernetes deployment with IT-Magic support services
- Frequently asked questions
Key Takeaways
Running this on your own AWS setup? IT-Magic is an AWS Advanced Tier Partner — we audit, fix, or fully manage it for you.
Get a free consultation| Point | Details |
|---|---|
| Use Deployments, not Pods | Deployments manage replicas and enable controlled rolling updates automatically for stability. |
| Define resource limits and probes | Proper CPU/memory limits and health probes prevent crashes and traffic errors during updates. |
| Start with at least 3 replicas | Multiple replicas and pod anti-affinity prevent downtime from single node failures. |
| Use explicit image tags | Avoid ‘latest’ tags to enable consistent deployment and easy rollbacks. |
| Leverage rollout controls | Configure maxUnavailable and maxSurge for smooth updates without user-impacting downtime. |
Preparing for your Kubernetes deployment
Before you run a single "kubectl` command, the work you do upfront determines whether your kubernetes deployment process goes smoothly or turns into a war room incident. Think of this phase as load-bearing infrastructure: skip it, and everything above it wobbles.
Start by confirming your cluster is healthy and kubectl is configured correctly. Run kubectl cluster-info and kubectl get nodes to verify that your nodes are in a Ready state and have sufficient CPU and memory headroom for the workloads you are about to add. A cluster showing NotReady nodes or resource pressure is not ready for a new deployment, regardless of your release schedule.
Key preparation checklist:
- Confirm all cluster nodes show
Readystatus and have sufficient capacity - Verify
kubectlcontext points to the correct cluster withkubectl config current-context - Store all YAML manifests in version control before applying them
- Define Services before Deployments so dependency injection resolves correctly at startup
- Review namespace isolation to avoid resource conflicts with other workloads
Preparing your Kubernetes setup correctly is also about choosing the right abstraction layer. The Kubernetes configuration best practices from November 2025 are direct on this: always use Deployments over raw Pods because they manage ReplicaSets, enforce desired replica counts, and support rolling updates automatically. Running bare Pods means a node failure takes your workload down with no recovery.
Understanding Kubernetes orchestration basics also helps your team reason about why Services need to exist before Deployments. When a container starts, it expects to resolve environment variables pointing to dependent services. If those Services do not exist yet, you get initialization errors that look mysterious but are entirely preventable.
| Preparation task | Why it matters | Risk if skipped |
|---|---|---|
| Verify node readiness | Ensures capacity exists | Pending pods, failed scheduling |
| Version-control YAML files | Enables rollback and audits | Untracked changes, config drift |
| Define Services first | Supports dependency injection | Environment variable resolution failures |
| Check kubectl context | Avoids deploying to wrong cluster | Production incidents from test configs |
| Review resource headroom | Prevents OOMKill events | Node pressure, pod evictions |
Pro Tip: Create a pre-deployment checklist as a pull request template in your Git repository. Every deployment starts with a filled-out checklist, not a Slack message saying “I think the cluster is ready.”
With preparation clear, now let’s execute your Kubernetes deployment step by step.
Executing your first Kubernetes deployment step by step
This is where theory becomes infrastructure. The step by step kubernetes deployment process breaks into clear, ordered actions that build on each other. Skipping steps or reordering them is the most common source of first-deployment failures.
Step-by-step execution process:
- Create your initial deployment using
kubectl create deployment myapp --image=your-image:tag. This creates 1 replica by default, which is fine for testing but not for production. - Write a production-grade Deployment YAML that specifies replicas, labels, rolling update strategy, and container ports explicitly. Do not rely on defaults in production.
- Apply the manifest with
kubectl apply -f deployment.yaml. Usingapplyinstead ofcreatemeans the same command works for both initial deployments and updates. - Expose the Deployment via a Service using
kubectl expose deployment myapp --port=80 --target-port=8080 --type=ClusterIP. This creates a stable DNS name and IP for your pods. - Verify the deployment with
kubectl get deploymentsandkubectl get pods. All pods should showRunningstatus and theREADYcolumn should reflect your desired replica count.
A production-ready Deployment YAML looks like this:
apiVersion: apps/v1
kind: Deployment
metadata:
  name: myapp
spec:
  replicas: 3
  selector:
    matchLabels:
      app: myapp
  strategy:
    type: RollingUpdate
    rollingUpdate:
      maxUnavailable: 1
      maxSurge: 1
  template:
    metadata:
      labels:
        app: myapp
    spec:
      containers:
      - name: myapp
        image: myapp:1.2.3
        ports:
        - containerPort: 8080
The Kubernetes official documentation describes a basic Deployment YAML that specifies apiVersion: apps/v1, creates 3 nginx Pods using image nginx:1.14.2 on port 80, and uses kubectl apply -f to deploy after ensuring a running cluster. That same pattern applies directly to your workloads.

| Command | Purpose | When to use |
|---|---|---|
kubectl create deployment |
Quick initial deployment | Testing and first run |
kubectl apply -f manifest.yaml |
Apply declarative config | All production deployments |
kubectl expose deployment |
Create a Service | After deployment is running |
kubectl get deployments |
Check deployment status | After every apply |
kubectl get pods |
Verify pod health | During and after rollout |
Scaling replicas after the initial deployment is straightforward: kubectl scale deployment myapp --replicas=5. For first deployments in production, start at three and let traffic data inform your scaling decisions.
Pro Tip: Pin your container image to an explicit SHA digest, not just a tag. Tags are mutable. A SHA digest guarantees you are running exactly the image you tested.
Now that your deployment is executed, let’s explore best practices to ensure stability and resilience.
Best practices for stable and resilient Kubernetes deployments
Deploying applications in Kubernetes is the easy part. Keeping them stable under real traffic, during rolling updates, and through node maintenance is where most teams underinvest.
Core stability configurations to include in every Deployment:
- Resource requests and limits: Always define
requestsandlimitsfor CPU and memory. Without requests, the scheduler has no basis for placement decisions. Without limits, a single misbehaving pod can consume an entire node. The production deployment guide recommends setting resource requests ofcpu:100m memory:128Miand limits ofcpu:500m memory:256Mias a reasonable starting baseline. - Liveness and readiness probes: A liveness probe restarts a container that has locked up. A readiness probe holds traffic away from a pod that has not finished initializing. Without a readiness probe, your load balancer sends live traffic to pods that are still warming up, producing 500 errors your users feel.
- PodDisruptionBudgets (PDB): When a node is drained for maintenance, Kubernetes needs to know how many pods it can remove simultaneously. Setting a PDB with
minAvailable:2for a 3-replica app and usingpreStophooks ensures graceful shutdowns and prevents all replicas from going offline at once. - Pod anti-affinity: Spread replicas across nodes explicitly. If all three replicas land on the same node and that node fails, you have zero availability.
| Configuration | Without it | With it |
|---|---|---|
| Resource limits | OOMKill, node pressure | Predictable pod placement |
| Readiness probe | Traffic to unready pods | Zero-error startup |
| Liveness probe | Stuck pods serve errors | Automatic restart on hang |
| PodDisruptionBudget | Full outage during maintenance | Minimum replicas always up |
| Pod anti-affinity | Single-node failure kills app | Replicas survive node failure |
The deployment health checks guide recommends setting livenessProbe with initialDelaySeconds:30 and periodSeconds:10, and readinessProbe with initialDelaySeconds:5 and periodSeconds:5. The different delays matter: your app needs more time to be truly healthy than it does to begin accepting traffic, and conflating these two thresholds causes unnecessary restarts.
Review orchestration best practices to understand how these configurations interact at the cluster level. For fintech workloads specifically, deployment stability configurations are often part of compliance requirements, not just operational preferences.
Pro Tip: Treat your Deployment YAML as a contract. If a configuration element is not in the file, it does not exist. Never rely on cluster defaults for anything that affects availability.
With best practices in place, let’s prepare for deployment update and troubleshooting strategies.
Updating and troubleshooting Kubernetes deployments effectively
Rolling updates are one of Kubernetes’ most powerful features. They are also one of the most common sources of production incidents when teams do not understand the mechanics.
How to manage a rolling update:
- Update the container image in your Deployment manifest to a new explicit tag.
- Apply the change with
kubectl apply -f deployment.yaml. - Monitor the rollout with
kubectl rollout status deployment/myapp. This command blocks and streams progress until the rollout completes or times out. - If the rollout stalls, check pod events with
kubectl describe pod <pod-name>to identify the root cause, such as a failed image pull or a readiness probe timing out. - Rollback immediately if needed:
kubectl rollout undo deployment/myapp. You can target a specific revision withkubectl rollout undo deployment/myapp --to-revision=2.
Rolling updates default to maxUnavailable:25% and maxSurge:25% of replicas, which is configurable for zero-downtime deployments on larger workloads. For a 10-replica deployment that means 2-3 pods can be down and 2-3 extra can run simultaneously during the transition. Fine-tune these numbers based on your traffic tolerance and infrastructure cost constraints.
Common rollout failure patterns and fixes:
- Image pull errors: Tag does not exist in your registry. Verify the image tag before applying.
- Readiness probe failures: New version takes longer to start. Increase
initialDelaySecondsin the readiness probe. - Resource pressure: New pods cannot be scheduled because
maxSurgerequires capacity that does not exist. Add nodes or reducemaxSurge. - CrashLoopBackOff: Application fails at startup. Check logs with
kubectl logs <pod-name> --previous.
Kubernetes ensures controlled rollout by scaling the new ReplicaSet up while scaling the old one down, preventing downtime during normal conditions. The problem is that “normal conditions” assumes your new image starts cleanly. That assumption breaks more often than teams expect.
For critical workloads, review rolling and canary update patterns to understand how canary deployments using tools like Argo Rollouts let you route a small percentage of traffic to a new version before committing to a full rollout. For fintech applications processing payments, this pattern is worth the setup cost.
Managing deployment updates correctly also means keeping your revision history clean. Set revisionHistoryLimit to a reasonable number like 5 so you have rollback options without accumulating dozens of old ReplicaSets.
Pro Tip: Always include a change-cause annotation in your deployment with kubectl annotate deployment/myapp kubernetes.io/change-cause="upgraded to v1.3.0". This makes rollout history readable instead of just showing timestamps.
Understanding update management helps confirm your deployment is successful and ready.
Verifying and scaling your Kubernetes deployment for production readiness
A deployment that runs is not the same as a deployment that is ready. Verification is a distinct step, and teams that skip it discover their gaps at the worst possible time.
Production readiness verification checklist:
- Run
kubectl rollout status deployment/myappand confirm it returnssuccessfully rolled out. - Check your ReplicaSets with
kubectl get rsand verify only one active ReplicaSet shows the desired replica count. - Run
kubectl get podsand confirm all pods showRunningwith aREADYstatus matching your container count. - Validate that your Service routes traffic correctly by running a test request from within the cluster using
kubectl exec. - Review pod logs with
kubectl logs -l app=myappto confirm clean startup with no errors.
Check deployment rollout status and ReplicaSets to ensure all desired replicas are ready and stable before you mark a release complete. This is the step most teams do manually once and then forget to formalize into their release process.
Scaling and autoscaling decisions:
- Always start with 3 replicas minimum to avoid downtime on failure, and use PodAntiAffinity to ensure those replicas spread across nodes rather than stacking on one.
- Configure Horizontal Pod Autoscaler (HPA) with
kubectl autoscale deployment myapp --cpu-percent=70 --min=3 --max=10to handle traffic spikes without manual intervention. - For fintech workloads with irregular traffic patterns, consider scaling on custom metrics like queue depth or request latency rather than CPU alone.
Verifying and scaling deployments properly is also about setting thresholds that reflect your actual business requirements, not generic defaults. A payment processing service has very different availability requirements than an internal reporting dashboard.
Now that verification and scaling are covered, we offer a unique perspective on Kubernetes deployment practices.
Why many Kubernetes deployments fail and how to succeed instead
After working through hundreds of infrastructure engagements at IT-Magic, a pattern becomes clear: most Kubernetes failures in production are not caused by bugs or hardware. They are caused by configurations that look reasonable but behave badly under real conditions.
The most consistent offender is single-replica deployments. Teams start with one replica to “test in production” and never change it. Then a node gets drained for a Kubernetes version upgrade, and the application goes offline for several minutes because there is no second replica to absorb the traffic. That outage happens at 2 AM because maintenance windows in cloud environments rarely align with business hours.
The second most common failure is the latest image tag. It feels convenient. It is actually a rollback trap. When something breaks and you need to roll back, latest at the time of rollback may point to a different image than latest at the time of deployment. Using explicit version tags for consistent pulls and reliable rollback is non-negotiable for any workload that matters.
The third pattern we see repeatedly is missing or misconfigured readiness probes. When a new pod starts, Kubernetes can mark it ready before the application inside has finished connecting to its database or loading its configuration. Traffic arrives, the application cannot handle it yet, and users get errors. The fix is straightforward. The cost of not doing it is visible in your error rate graphs.
Common deployment mistakes in our experience are almost never exotic. They are the fundamentals, applied inconsistently or skipped under time pressure. The step by step kubernetes guide discipline matters most precisely when teams feel too busy to follow it.
Enhance your Kubernetes deployment with IT-Magic support services
Knowing the theory of deploying applications in Kubernetes is one thing. Executing it reliably across a production environment under real constraints is another. For startups scaling quickly, fintech firms managing compliance requirements, or enterprises running multi-cluster environments, the gap between knowing and doing cleanly is where incidents live.
IT-Magic’s Kubernetes support services cover the full deployment lifecycle, from cluster setup and manifest review to rolling update automation and incident response. Our certified AWS and DevOps engineers have delivered 700+ infrastructure projects across exactly these environments. We also help teams reduce cloud spending through AWS cost optimization services without compromising the availability your workloads require. If you are ready to move from ad hoc deployments to a repeatable, production-grade process, we can help you get there faster and with less risk.
Frequently asked questions
What is the main advantage of using a Deployment over directly managing Pods in Kubernetes?
Deployments manage ReplicaSets to ensure desired pod replicas are maintained, enable rolling updates, and provide rollback capabilities, which direct Pod management lacks entirely.
How do readiness and liveness probes affect Kubernetes deployment stability?
Readiness probes prevent traffic to unready pods during startup, while liveness probes restart unhealthy containers automatically. Configuring both probes with appropriate delay settings is essential for stable rollouts.
Why should I avoid using the ‘latest’ tag for container images in Kubernetes?
Using latest tags prevents reliable rollbacks because the tag may resolve to a different image at rollback time. Use specific version tags for every production deployment to ensure consistency and rollback safety.
What are recommended minimal replica counts for production Kubernetes deployments?
A minimum of three replicas is recommended to avoid downtime on failure, combined with PodAntiAffinity rules to ensure replicas spread across different nodes.
How do rolling update settings like maxSurge and maxUnavailable affect deployments?
They control how many pods can be created above the desired count or become unavailable during an update. Configuring maxSurge and maxUnavailable explicitly balances deployment speed against uptime requirements for your specific workload.
Recommended
- How to Set Up Kubernetes: Step-by-Step Guide for IT Leaders
- Kubernetes orchestration explained: ensure scalability and control
- AWS EKS explained: streamline Kubernetes for scalable success
- Kubernetes Support Services | IT-Magic
Alexander founded IT-Magic, an AWS Advanced Tier Services Partner delivering DevOps, cloud architecture, and managed services since 2010. He holds:
- AWS Certified Solutions Architect – Professional
- AWS Certified DevOps Engineer – Professional
- AWS Certified Security – Specialty
- AWS Certified Advanced Networking – Specialty
Talk to a certified AWS team trusted by INTERTOP, Foxtrot, Pandora, and J.Hilburn.
Get a free consultation